Princess Seam
Published

A princess seam is a long, curved seam that runs vertically over the bust, from the shoulder or the armhole down to the waist or all the way to the hem. It shapes the garment to the body without any darts. The shaping that darts would normally do is built into the curve of the seam instead.
Princess seams are found on fitted dresses, bodices, jackets, coats and strapless tops, and they're one of the most flattering and most fittable lines in dressmaking. The name is usually traced to the "princess line" dresses of the 1870s, often associated with Charles Frederick Worth and Alexandra, then Princess of Wales. See Notable Figures.
How a princess seam replaces darts
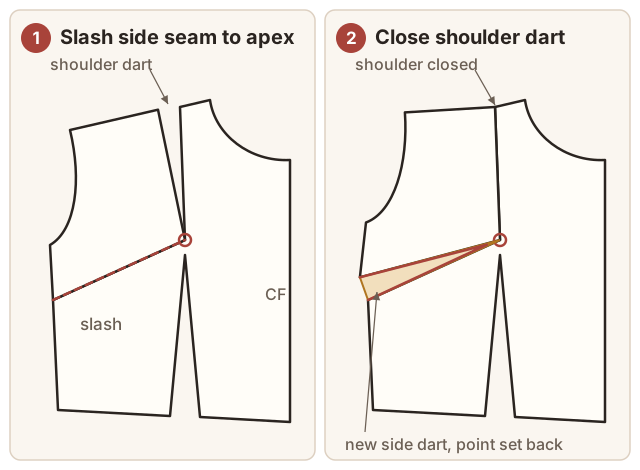
On a basic bodice, the bust dart and the waist dart both point at the bust point. A princess seam joins them into one line. The shoulder (or armhole) dart and the waist dart are connected through the bust point, and the pattern is cut apart along that line into two pieces: a centre panel and a side panel. When the curved edges are sewn back together, the seam does the work of both darts. See Basic Bodice Block for dart rotation, the technique this builds on.
Shoulder or armhole?
- Shoulder princess seams start at the middle of the shoulder seam and run straight down over the bust. They give a long, slimming line and are the traditional version.
- Armhole princess seams start partway down the armhole and curve over the bust. They're easier to fit and sew, because the curve is gentler, and are common on modern dresses.
Why princess seams are easy to fit
Every princess seam is a place where the fit can be adjusted along its whole length. You can let it out or take it in over the bust, at the waist or at the hip, independently of the other seams. That makes princess lines a good choice for fuller busts or for bodies that are a different size above and below the waist. A full bust adjustment on a princess seam pattern adds room to the side panel's curve, with no darts to redraw. See Fitting and Alterations.
Sewing princess seams
The two edges of a princess seam curve in opposite directions: the side panel is convex over the bust, and the centre panel is concave. To sew them smoothly:
- Staystitch the concave (inward-curving) edge of the centre panel within the seam allowance. See Staystitching.
- Clip that staystitched edge at intervals, almost to the stitching, so it can spread to fit the convex edge.
- Match the notches, especially those above and below the bust, and pin closely in between.
- Sew with the clipped (centre) panel on top so you can see it spread and keep it smooth.
- Press over a tailor's ham, so you don't flatten the shaping you've just sewn. See Pressing.
Princess seams also make natural channels for boning in a fitted bodice. See Boning a Bodice.